Do you have a friend or loved one who is interested in learning to shoot? When I am asked for suggestions, I pose this simple question: Why do you want to learn? Many adult beginners want to learn for self-protection, to shoot targets, or possibly even hunt someday. As an instructor, here are the steps I like to take with new shooters to teach them the basics, and then hopefully lead to bigger things. Naturally, Step Zero is to emphasize the NRA's Three Rules of Gun Safety (1.ALWAYS keep the gun pointed in a safe direction; ALWAYS keep your finger off the trigger until ready to shoot; ALWAYS keep the gun unloaded until ready to use.) With that as our backdrop, here are the next steps that have worked for me as an instructor.
1. Pick the Right Training Tools
Many instructors choose to start their adult beginners the same way we often start juniors—with an air rifle. They’re a great way to “break someone in easily” due to no recoil or blast, but a lot of excitement when the target is hit or can rolled at 10-15 yards. I like to start everyone and at all ages from a bench with a rest. To begin, what I found that is easy to set up is the Caldwell Fire Control Rest. It can easily be adjusted for rifles of any length and it secures whatever, with the fore-end resting between shooting bags and the stock against the shooter’s shoulder.
2. Make Sure the Shooter Can See the Target
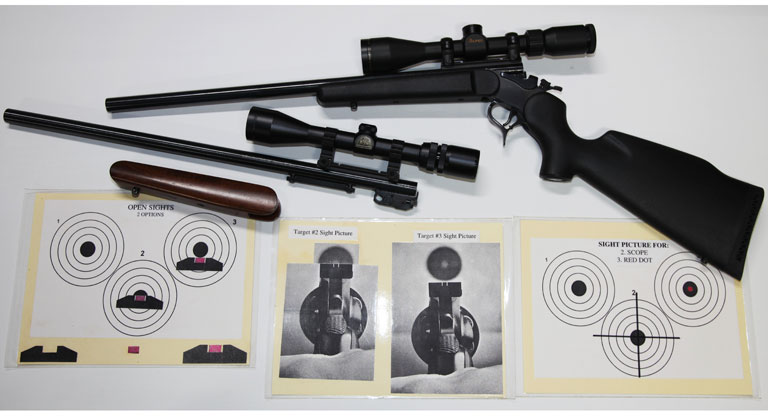
Many instructors will state that a new shooter should start out with open sights. Yet, I prefer to start them off using a scope. My reasoning is that it is easier for someone to put the center of a crosshair or red dot on the center of a target with the rifle on a steady adjustable rest. Then once that person understands this simple concept and hits the target consistently, I then go to open sights. To visually explain sight alignment, I use sight/target diagrams demonstrating how they should position the front and rear sight so to hit the center of the target. With this two-stage approach, I feel that the individual knows what the various sighting options are all about.
I like to give new shooters this advice while they’re getting used to their optic: With the rifle butt on your shoulder, put your head/cheek on the stock. If the fit is correct, you will be looking down the barrel through whatever sight you have selected to use.
3. Be Careful Mounting Scopes
Eye relief, or distance from the scope to one’s eye is critical. If the scope is back too far on the action, there is a good chance that it might recoil back into the soft tissue between or around the eyes—e.g., “scope bite.” This is particularly important with air rifles. Yet, a non-recoiling rifles scope can hit the eye when someone jerks the trigger backwards and with that, moves the total rifle backwards and into the eye area.
4. Emphasize Trigger Squeeze Techniques
I have observed various new shooters rapidly pull the trigger backwards to fire. With that exaggerated motion, the rifle moves, they are no longer on target, and a miss is usually the result. Dry-fire practice is a great way to practice trigger squeeze, but remember: If you’re using air rifles or rimfire rifle, damage can be done to these guns by dry-firing. On a regular rifle snap caps work so the firing pin is not damaged. On an air rifle, just fire pellets into the target set up for pellets since they are not noisy, are inexpensive and offer no recoil. Concentrate, squeeze and it will all come together.
5. Don’t Push It Too Hard
If your new shooter gets into a slump, it’s okay for them to quit for the day and reflect on why. My old pistol team coach, Sgt. Ross, when a cadet started shooting badly, would say, “Put the pistol away and I do not want to see you for three days. You are in a slump and I do not want you to practice whatever you are doing wrong so get out of here.”


